Saturday, December 29, 2007

Changing Windows Start Button Text

Republished from : http://bestlesson.50webs.com, http://www.pc4safe.com
Step 1.

The main process to be done for changing the Start menu text is editing the windows explorer file named "explorer.exe". The only way is that.

As it is a compiled files, we cannot edit a .EXE file in a text editor or something like that. We must have an special editor for editing files like these.

In this Lesson I am using the editor called "Resource Hacker", which is an open software. You also can download it from here (Download Resource Hacker). After you have downloaded the Resource Hacker, move to following step......


Step 2

In case of any system failure changing the system file, Take a backup copy of you explorer.exe file which is in your WINDOWS folder (eg.c:\windows\explorer.exe).

Step 3

Launch Resource Hacker. Open the file explorer.exe from your windows folder. You will get all resources listed in you resource hacker windows's left pane.

step 4

(If you are using windows theme in classic mode skip this step and proceed to step 5)

Point to <String Table> list item and expand it. Expand the number 37 and point to number 1033. You will get properties for those in right pane as seen on screen shot. Then point to the text "start". There, give your own text (what ever you like).

Step 5

If you are using windows classic theme...

Point to <String table> list item and expand it. Then expand the number 38 and point to number 1033. You will get properties for those in right pane as seen on screen shot. There, Change the text "Start" which is right after number 595 to which you like.

Step 6

Now you have done!

The next thing you should do is to press the <Compile Script> button above the right pane. After you works compiled go to File->Save As... , and save the explorer.exe file with a different name (eg: myexplorer.exe).

Step 7

This step is to edit windows registry file in order activate myexplorer.exe which you complied and saved in previous step. Follow..

  • Open start menu and click on Run...
  • Type Regedit in open combo box and then press Enter Key or OK. (Register editor will open up..)
  • Expand HKEY_LOCAL_MACHINE -> SOFTWARE -> Microsoft -> Windows NT -> Current Version -> Winlogon. (Before you edit your registry, Take a backup copy by clicking on File -> Export.. in the main menu)
  • Point to the String value Shell in the right pane of the registry editor and double click it to open.
  • In the opened window, Change the Value Data to the name of explorer file you saved (eg: myexplorer.exe)
  • Click OK.

Step 8

Now You have finished all requirements. Restart windows to see the changes you have made.

Friday, December 28, 2007

Adding Image Signature to your GmaiL

Email signature is something that appear in the footer of each email you send.
By default, there is no a way to add image signature to gmail. It allows us to set a text based signature.

Inserting a text signature.

  • Open up your Gmail account. http://www.gmail.com
  • Go to settings
  • Go to General
  • Browse to Signature
  • write the signature which you want that should be appear in the footer of your each email.
  • Now. Click Save Changes button.

That's it. you have created the test based signature.

Inserting an Image Signature


If you need to insert image signature, you don't have a way to be added automatically to each mail when you are pressing the compose Mail. So we have to use some different techniques. First, You need an image in your clipboard.

Copying an image to the clipboard
It would be easy if you have an image (that is suitable for signature) in your one of email. Then open it and click forward. It will bring your current email to a new compose window. From that you can select and copy the image. Now you have an image in the clipboard.


Adding the image to the new message
Compose a new mail. Move the cursor where you need your signature to be added. Now paste the image.


That's it. You added the image signature to your email.
Now send the maiLLLLLLLLLLLLLLL.

Tuesday, December 4, 2007

Auto CAD 2008 Tutorial

Sunday, June 3, 2007

Capture your browser & Mail it. It's easy

Firefox 2

I am using Mizilla FireFox for all my web browsing. Recently upgraded to Mozilla version 2. The new and enhanced version. When I was walking around the Mozilla's plugin pages I got this interesting ClipMark plugin.

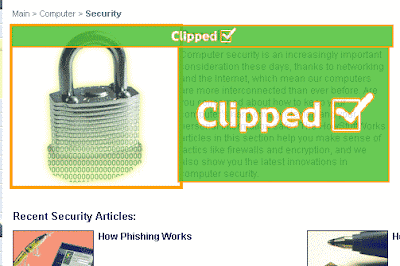
With Clipmarks, we can clip the best parts of web pages. Whether it's a paragraph, sentence, image or video, we can capture just the pieces we want without having to bookmark the entire page. Not only that, and a great feature which it provided is the E-Mail. Capture it and mail!

No need of loggin to E-Mail accout;
no need of copy and save ;
no need to attach etc.

what to say with that plugin's features!!!!


Downloading & Installing the plugin

Visit Mizilla plugin page ->
https://addons.mozilla.org/en-US/firefox/search?q=clipmark&status=4
Download & Install- >
Restart the FireFox ->


Simple way to clip, save & mail

Click on the Clip Mark icon on the top of Browser, near the address bar.


There will be a ribbon displayed on top of the browser display area.


just choose the portion on the browser display area.


After choosing you have more option to select on the ribbon displayed by the clipMark.
It can be
* Printed
* Mailed
* Save (needs to register with clip mark for an account : free registration)
* Blog

Select any option you would like from the ClipMark ribbon. And it will get you through the way...


Firefox 2

Friday, June 1, 2007

Download Vedio from YouTube

Many people are watching YouTube videos every day. But some are thinking to keep the videos they watch within their desktop. Although You Tube's video format does not allow to save the video directly into PC. It uses a different video format. It is not mpg, wmv, mov, dat, avi or nothing what we regularly use. Its own video format is ".FLV".

A day before I wanted to download a video from You Tube. I ran around the Google, yahoo, forums, etc. etc. to find a way. Eventually I got a way to download them. It is simple. See what I did.


The first thing that helped me is Mozilla Fire fox's Video Downloader Plugin.

I downloaded it from Mozilla Video Downloder Add-on Page.

This plugin supports to download videos from Youtube, Google, Metacafe, iFilm, Dailymotion, Pornotube... and other 60+ video sites ! And all embedded objects on a webpage (movies, mp3s, flash, quicktime, etc).

After downloading and installing this plugin Firefox adds an icon in the Task Bar bottom of the window showing Video Downloader.


The way to download Video from You Tube

  • Go to the You Tube page that contains the video that you need to download.
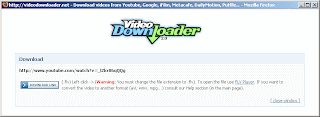
  • When the page is opened, Click the Video Downloader icon in the task bar.
  • The following window will appear.

(Click the image to enlarge)

  • Click the Download Link button.

The video will be downloded to the specified location when you clicked.


Now the Downlaed is complete !!!!!

Now the Video is downloaded. But it cannot be played in regular Media Players. It need a separate player and to be renamed with the extension (.FLV).

To play the Video follow the steps below.

  • Rename the downloaded file to the extension .flv(select the downloaded file -> pres F2 -> type ".flv" at the end of the file name).
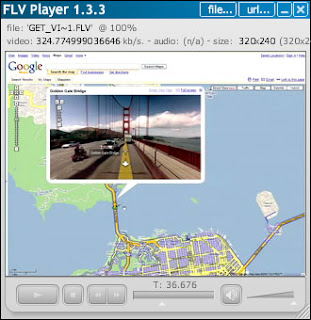
  • Then Download the FLV player (This is a light weight player that need to play .flv files).
  • Download locatoion -> http://www.download.com/FLV-Player/3000-2139_4-10467081.html
  • Install it.

Now it is dOne!!

Double click your Downloaded video file or open it from FLV player.


Now the video is inside my PC. And I have player for that.
Nice!! This is what I did !!!!!

Wednesday, May 30, 2007

Using Tamil Key in Firefox - தமிழ் in இணையம்

Mozilla Firefox is a one of widly used web browser all over the world. Its day to day increasing features are amazing.

WOW! There are too many plugins that can be added to the browser - Mozilla Firefox. Last week I found a really good plugin. That is Tamil Key. This addon has been developed by Muguntharaj, voiceonwings, Gopi . I can ensure that it is one of very helpfull plugins to peaople who needs to use tamil language over the internet, email, searching, bloging. etc...


The easy to use way of Tamil Key

Tamil Key இன் முக்கிய அம்சங்களில் ஒன்று என்னவெனில், அதன் இலகுவான Key board பாவணைமுறையாகும். Tamil key ஆனது 5 வகையான கீ போட் மாதிரிகளைக் கொண்டுள்ளது. இதன் இந்த 5 வகைகளையும் வெவ்வேறு வகை key board பாவணையாளர்களும் தங்கள் வசதிக்கேற்றாற்போல் மாற்றிப் பாவித்துக்கொள்ளலாம்.

அனுமதிக்கப்படும் key board உள்ளீட்டு மாதிரிகள்
1. அஞ்சல்
இதன் முக்கிய அம்சமாவது, இவ்விசைப்பழகையை ஆங்கில எழுத்துக்களை type செய்யப்பயண்படுத்துவது போன்றே பயண்படுத்தலாம். உதாரணமாக,
thamiz = தமிழ்
thambi = தம்பி
suuriyan = சூரியன்
pattam = பட்டம்

2. தமிழ்99
3. பாமினி
இந்த விசைப்பலகையானது kalaham, Bamini, Kuspoo, Sarukeshi போன்ற font பாவணையாளர்களுக்கு பாவிக்க மிகவும் சுலபமான முறையிலமைந்ததாகும்.

4. பழைய தட்டச்சு
5. புதிய தட்டச்சு

Some features that can help us..

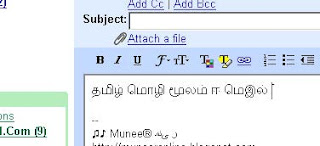
1. Sending mails in தமிழ்
The people who are using GMAIL can use this plugin to send mail in tamil.

ஜீ மெய்ல் பாவணையாளர்கள் இந்த plugin ஐ பயண்படுத்தி தமிழ் மொழி மூலம் இழபகுவாக ஈ மேய்ல்கள் அனுப்பலாம்.
இந்த முறை மூலம் அனுப்பப்படும் email கல் Gmail பாவிக்கும் எந்தப் பாவணையாளர்களாரளும் தமிழ் மொழி மூலமே பெற்றுப் படித்திட முடியும். இதற்கு இவர்கள் தமிழ் font install செய்திருக்க வேண்டிய அவசியமில்லை. Windows Xp, 2000 என்பவற்றில் யுனிகோட் (Unicode) எனப்படும் இந்த எழுத்துருக்கள் தானாகவே நிறுவப்பட்டிருக்கும்.

2. Searching in Yahoo, Google, etc.
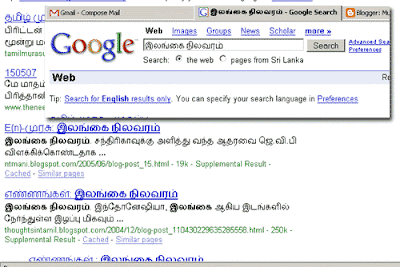
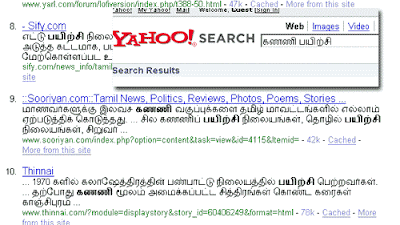
தமிழ் மொழி மூலம் தேடுதல்

In GOooogLe!
In YahOoo!


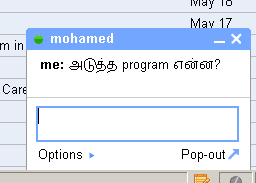
5. Google Chat


4. Blogging
Bloggers can use tamil easily in their bLogging as I have used.


Installing and using Tamil Key

தமிழ் விசை பலகை இங்கிருந்து பதிவிறக்கம் செய்துகொள்ள முடியும். https://addons.mozilla.org/en-US/firefox/addon/2994.

தமிழ் விசைப்பலகை install செய்யப்பட முன்னர், கணணியில் யுனிகோட் தமிழ் நிறுவப்பட வேண்டும்.

1. Follow this way -> Installing Multiple Languages - Unicode
2. Next, Install the Tamil Key plugin
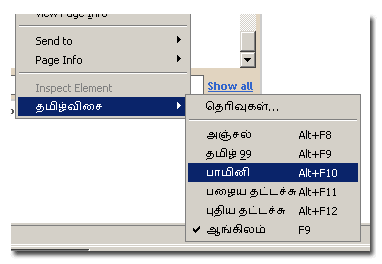
3. After it is installed, You will get a pop up menu like below within FireFox browser when you right click.


4. Now its ok. Use the layout u want..

Sunday, May 20, 2007

Flash Memory vs Autorun Virus/Trojan

It is better to know something about viruses that affect the flash memories. Because no one can say I am safe from virus even though you are using any, new, updated, and power full antivirus software. You may ask why? yes, it is because.. You might have installed and keep up to date anti-virus software within your laptop or PC. But sometimes you would need to use your Flash memories in other PC's as well. You can't avoid it. It is the one of main purpose of flash memory.

Flash memories are becoming as a main target for viruses and Trojans. I have Little experience fighting with a kind Of autorun virus virus that affects flash memories past days.

That main medium for that virus to spread is the flash memory. If you have a computer affected by that kinds of virus, the first job of that virus is to disable the folder option in windows Explorer/folder. It a main trick of it. Later I'LL come to that point. Then it resides in memory and searching for any new storage devices to be detected.

Normally you know if a Flash memory stick is plugged in to USB port, PC automatically detects it and open the root folder or ask you to select the action. When the virus detects these flash memory, It automatically copies the virus (one or more executable files) in to the flash memory. not only that, it also create an Autorun.inf file in the root of the flash memory and inside the fiLes it makes a Link to the virus's executabLe file. The second step of the virus's Job is now over.

Again you may use it in another PC as well. Yo may guess what wiLL happen if this Flash memory stick Will be plugged in to another PC that is not protected by any antivirus software. Here it starts the 3rd job. Then the flash memory is inserted, the autorun.inf file starts to work and run that executable virus file. Then this PC also falls in to the virus hell. And it is also now ready for spreading virus. This the Life cycLe of that virus.
And there is another big trick with some of these kinds of viruses. You may have important datas inside your flash memories which you frequently open. These kinds of virus use this point to attack your system. You Know how??

When the flash memory is plugged in to the affected PC, the virus hides all your document's folder with the attribute (S & h). then copies the copy of virus's executable file in the name of your file's folder and change its icon same as a foLder icon. any one open the flash memory Will double click those executable virus file thinking it as his file's folder. again it starts it Life cycLe. how tricky is it??


How to overcome from this virus

I am using NOD32 anti-virus software. After I installed this software, I found this is a best one for dealing with these autorun Trojans. below is an screen shot how NOD 32 detects the virus when flash memory plugged in.

If you wish to download NOD32 you can purchase or download a 30 days trial version from Original ESET's website here http://www.eset.com/download/index.php.
Bye!

Monday, May 14, 2007

Recovering DeLeted Datas from Pen Drive


Last time I discussed ablut getting the datas back from a Pendrive that has errlr. But in slme cases, we may accidentLy deLete datas from our pendrive. This is a most happening probLem with pendrives as because they are used in severaL PCs and pLaces. It may happen by our own.

Then what to do?? can say the boss "sory, I deLeted the datas"?? no. Then some how you have to get them back.

first of all it is better to know what happens to fiLes when they are deLeted.
ye! When you deLeted fiLes actuaLLy it is not removed from the computer. No even if you delete from RecycLy bin. In microsoft Windows O/Ss the filLe information is stored ni File Allocation TabLe (FAT/NTFS). If the fiLes is deLeted onLy the information on the FAT is removed and the free space is seen increased. The fiLe remain same. onLy when another new fiLe is copied to its physicaL Locatoin, the deLeted fiLes are Lost.

Then, hOw can we get them back??

There are many softwares that can work for us. I am usin DiskInternal's Dataeraser. I can say it is a good software to my concern. May be there more s/w better than this.

DiskInternal provide many tools to data recovery personels. I found it as a nice & easy to use tooLs for any one who is expert or even novice user. Here you can download & install the software. But the trial version is limited onLy for searching the deleted files. If you find you worth files are among these recoverable file then it would not be waste you to pay for it. Any way, the web is a Large store. you can go with it!!!
Don’t confuse. Above is not Windows folder. It is the simple user interface of DiskInternals Uneraser2.9. Working with it, is ease too.

If you need to recover deleted files on your pendrive, onLy thing you have to do is..

1. Plug in the Pendrive in PC
2. Start the Disk Internals Unerase.
3. DoubLe cLick the pendrive

Then a windows’s foLder-like window containing file in Pendrive will open. Among thoise files there is a foLder named “Recovered Files”(See below screen shot).

4. DoubLe click the Recovered files folder.


Then, the software automatically makes a deep search inside the Pendrive and displays aLL the files that can be UndeLeted/Recovered.
ProbabLy it will contain your deleted files!!!


The recovered files are grouped in each folder according to their file type. You can go through folder and select the files that want to be recovered

5. doubLe cLick on a file the which you want to recover

The foLLowing recovery dialogue box will appear.

6. Select a target path(The path where recovered files to be saved).
7. SeLect operating system where the file was deleted. If don’t know, select “Don’t Know”
8. Click save.

That’s aLL !!! Your file is recovered.

Yet, this software has more advanced features to recover more depth. The compLete instruction is provided in the manual.

DiskInternals provide More softwares to work with Datarecovery. SpeciaLLy I have to say another one. DiskInternals Flash Recovery. It is specially made for recovering photos from Digital Camera Memory chips. I quote below some more software for datarecovery. You can use any one that best compfort to you.

DiskInternals itself provide sOme toOoLs fOr data recOver

  • DiskInternals Uneraser
  • DiskInternals Flash Recovery
  • DiskInternals NTFS Recovery
  • DiskInternals CD/DVD Recovery
  • DiskInternals Partition Recovery
  • DiskInternals FAT Recovery
  • DiskInternals Outlook Express Repair
  • DiskInternals NTFS Reader (It is for Win9x os)
  • DiskInternals ZIP Repair (Easy and free fix for damaged zip files)
  • DiskInternals Linux Reader (A new free tool for extracting files from Ext2/Ext3 partitions in Windows)
  • DiskInternals Music Recovery

Some Other Softwares that can be used for data recovery

Wednesday, April 11, 2007

How to recover a Pen drive from Read Error


Here I would like to share my some of experience. Some days before I faced a problem with ma Pen drive. I copied 4 word documents which contained images and were little Larger in capacity. Say about 2 to 4 MB in capacity. Actually it is not my Pen Drive. I borrowed it from one of ma friend. It was 2 GB in capacity and Kingston in Brand.

All files ware copied smoothly. No errors were found. Everything was fine until I took it to the office. When I tried to get the documents back to ma office PC, then I came up with an error message. “Cannot read from source disk” at the middle of file copy process. Mmh! That is the problem. I stoped there. And think.. think.. think… Finally I got an idea. Lets see weather it worked for me or not.

First, I scanned the drive using Scan Disk. Here is how I did it.
Go to my Computer. Then right click the Pen Drive icon. In menu that appear select Properties.

Then the property dialogue box will appear. There select tools TAB and press Button.


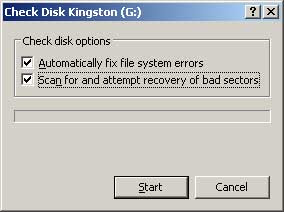
And in next dialogue select the two check boxes. And press start.


This will completely check the drive and attempts to recover any data that is located on a damaged (Bad sector) area of the Drive.

This is what I did. Yap! It was successful to me.

But in some occasions even this wont work. That is because of Disk Error. If there is a disk damage or bad sector this would happen. In those occasions we can get only the datas which are on non bad sector areas. If it happen, we must secure those areas without any files would be copied again to those areas for our future safety.

I stop here today. It is getting dark in my Friday evening. I’ll discuss how to recover the bad sectored or damaged Pen Drive on next weak or before when I have fresh time.

Thursday, March 15, 2007

Installing Multiple Language - Unicode

Windows comes with many language support including right to left languages. For example, Arabic, Armenian, Hebrew, thai, etc. For using various language in our application we must enable keyboard support to be used in windows for any languages.

These Languages are called unicode. The speciality of this unicode is, if we Installed and used these keyboard to type somthing, the reader dont need to install any seperate fonts to read the text. It will be automatically displayed in the readers PC with appropriate font.

Installin Additional Language support

1. Open the Regional & Language Option
Start - > Settings -> Control Panel -> (Double Click) Regional and Language option


2. Select the check box Install files for complex script and right to left languages.
3. You will be prompted to insert Windows XP CD. Then, insert it and wait untill installation finishes.
4. Reboot your machine and follow..

5. Follow thw Step 1.

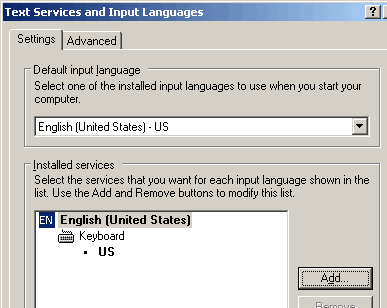
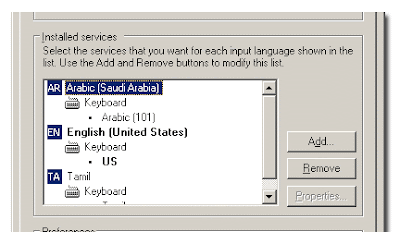
6. In regional and language option window click Deatails
You will get the following dialogue box (Text Services and Input Languages)


7. Click Add..
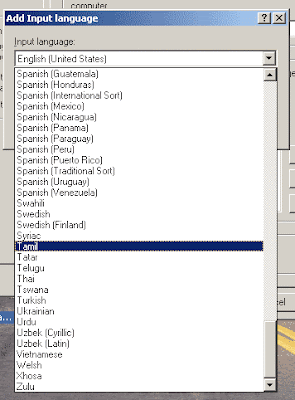
8. following dialogue box will apperar. Choose the language you want to use.


9. Click OK
(Text Services and Input Languages) will now show up like following

10. Click Apply & OK.

Now your windows task bar will appear as follow. A new language bar is added to your Task bar. You can click on it and and select the appropriate language.

Now your computer supports unicode keybord !!!!!


Some Usefull Links

* What is Unicode?- Unicode Resources
* Alan Wood's Unicode Resources
* Arabic Keyboard Language Keyboard Support for windows operating system
* Unicode fonts for Windows computers

Tuesday, February 13, 2007

Office 2007 - What are New?

Hi,

I talked tO you 2 days ago abOut the new realease and past days Of MS Office.
To day I am gOing tO give you sOme new thOughts behind Office 2007, the new
reLease.

Go thrOugh............


"In Office 2007, we've done something else that we've never done before:
given you a choice of skins for the user interface. If you don't like the
default blue skin and would prefer something more neutral, we've got you covered
with the striking new black skin.


On Windows Vista, of course, we fully support glass in both skins. I'll get you
some screenshots of that in the not-too-distant future.
"

Jensen
Harris


Thursday, March 09, 2006

The Microsoft Office 2007 is the most recent version of Microsoft productivity
suite which is formerLy knOwn as Office 12. On november 30th 2007, it was
reLeased tO Business customers in the initiaL beta cycle. And made avaiLabLe tO
retaiL custOmerOn January 3oth 2007 which was the same day Of the fOrmaL tO
retaiL custOmer Of Windows Vista.

MicrosOft has remOved MS FrontPage entireLy. It is nO Longer being deveLoped.
And its repLaced with Microsoft SharePoint Designer .


What are New with Office 2007 (MS Office 12)?

User Interface

Office 2007 cOntains a number Of new features, the More notabLe Of which is the
entireLy new GraphicaL user Interface caLLed RIBBON that bLends MENUs and
TOOLLBARs tOgether.

"I started here as a designer many moons ago and now lead a team of user
experience designers and researchers that are infinitely more talented than I
could ever dream of being. We're the interaction design experts that Steven
mention in his
blog
back in December
.

As designers, we are pretty... geeky. We have some pretty developers too...
pretty designee that is. Actually, the developer and designer relationship in
Office is nothing like Beauty and the Geek at all. Maybe it's the mutual
admiration of their respective craft. Maybe it's the recognition of how far the
industry has to go toward bringing the beauty out of the geek. Maybe it's a
shared acknowledgment that beautiful products go beyond the skin.


Somehow, some way, we've managed to establish and grow a pretty meaningful
relationship over the years. It's a bond that has culminated in our most
attractive release of Office ever. As it turns out, you can't have high design
without deep engineering. That's right--you can't have beauty without the geek.
"


Brad Weed,
Product Design Manager of the Office Design Group


Office Button

Office 2007 buttOn Located On the tOp Left Of th ewindOw, repLaces the "FiLe"
Menu & prOvide access tO functionaLity cOmmOn accrOss aLL Office appLications,
incLuding Opening, Saving, Printing & sharinga fiLe. ChOosing coLor scheme is
aLsO pOssibLe with the buttOn.

Ribbon

OfficiaLLy knOwn as Microsoft Office Fluent. The Ribbon is designed tO make the
features Of the appLication mOre discOverabLe and accessibLe with fewer mOuse
cLick as cOmpared tO menu-based User Interfaces untiLL Office 2007.


Contextual Tab

These tabs are intended tO appear when certained Objects are seLected. It shOws
Options specific tO the seLected Object. Take, fOr exampLe, SeLecting a picture
fires up the Picture Tab.


Live Preview

And anOther interesting feature is this. When the user Mouse Over in any
fOrmattin buttOns, the tempOrary fOrmating is appLyed tO the fOcused Text. The
tempOrary fOrmat remains untiLL the Mouse taken away frOm the bUttOn.

Mini Toolbar

Which pOps up near the seLected text whenever sOme text is seLected, provides
easy access tO mOst used fOrmatting cOmmands.


Zoom Slider

It aLLows dynamic & rapid magnificatiOn Of a document. And it is pLaced in the
bOttOm right cOrner.


Smart Art

Smart Art is a new grOup Of easiLy editabLe and fOrmatted diagrams. It cOntains
115 preset graphic layout templates.


File Format

Office Open XML. It is a new fiLe fOrmat MicrosOft Office has been cOnstructing.
It is based On XML & uses ZIP cOntainer. For micrOsOft wOrd dOcument it is saved
as ".DOCX" which was saved in previOuse versiOn as "DOC". And fiLe that cOntains
Macro wiLL be saved as ".DOCM". And aLso can save the fiLes in ".DOC" format tO
use with prteviOus versiOn of MS Word.


User Assistance System

With the new reLease Of Office 12, The Office Assistants have been cOmpLeteLy
remOved and are repLaced with the imprOved versiOn Of heLp system. It apears &
diappears Like nOrmaL tOoLtips.

Colloboration Features

It is a feature fOr coLLobratiOn & data Sharing. And it features server cOmpOnents which wOrk in cOnjunctiOn with ShardPoint Services.


Theme & Quick Style

Microsoft introduces a new Document Theme & Quick Style. It defines the Color,
Fonts and graphic effect Of a dOcument. The fiLe fOrmat ".THMX" is shared
between Word, ExceL, PowerPoint & OutLOok.

It is enOugh fOr nOw. I wiLL taLk mOre in the futre.

I WeLcome your comments.

Sunday, February 11, 2007

MS Office 2007 Released !


Its a calm evening. I am in the Office working with MicrosOft Office 2003. I have been using Microsoft Office package since 1998 when the Microsoft Word 6.0 was On the fly. Its a great experience I feeL with MS Office. It heLped me in the aLL aspect Of my works tO be dOne perfectLy.
The most i gOt in MS Office are frOm are MS Access, MS FrontPage, MS Word & MS Excel. Others are seLdom used. NOt aLways.
Today the 11th February 2007. Microsoft has been announced the reLease Of its new version Of Office Package. I am interested tO move tO the new version of Microsoft Office 2007.
I am sure there wiLL be more new interesting features Of that. For my I wiLL taLk about it having sOme experience On that.
May be a week!
Wait & seee.